Colored Pearls on Plane
This second tutorial will teach you how to vary features, which were predefined in prototypes. We learn to color the scene and tune various attributes. Furthermore, a plugin will be used to achieve our goal of intentionally varying features in a certain way.
At a Glance
What We Will Learn
Create an interesting colorful scene
Manipulate attributes via sets
Learn to know plugins and use them
Advanced use of
RelaxCollisionsfunctionAdapt render parameters
Step 1: Recipe Creation and First Look
We start by creating a recipe with name colPearls_plane.yaml in the recipes subfolder under our root folder of synthPIC2. Let’s add the main sections.
# Initializing and seeding
defaults:
  - BaseRecipe
  - _self_
initial_runtime_state:
  seed: 42
These first lines of code will link the default recipes and give a seed to reproduce this exact run, i.e. this specific version of execution of the recipe whenever a random number is drawn.
# Defining blueprints
blueprints:
  measurement_techniques:
    TopCamInAir:
      measurement_technique_prototype_name: plane_topCam_fog
  particles:
    Bead:
      geometry_prototype_name: sphere
      number: 40
This time, our specified prototypes plane_topCam_fog and sphere are purposefully designed elements of the library rather than just importing the default prototypes. Default prototypes are usually meant to create a scene, which is not aimed at the investigation of specific features of certain particle types or measurement techniques. But rather to quickly create a recipe with often another scope than generating a desired look in an image by physically based rendering. This could be, e.g. the sole export of a procedurally generated geometry.
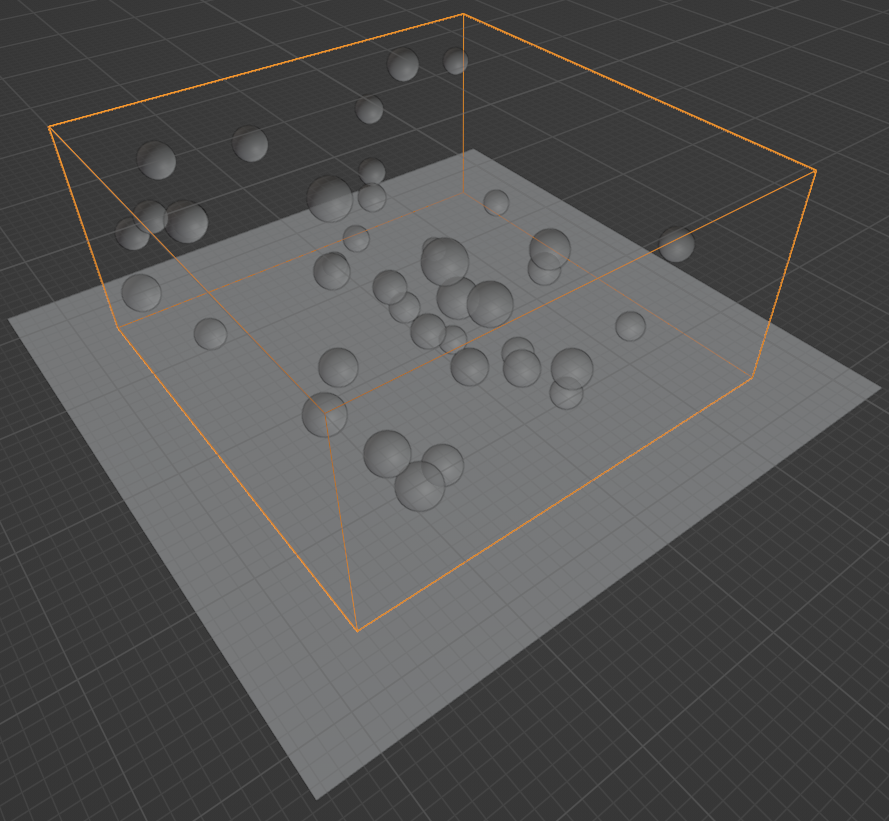
In our example, we define two blueprints. One for the scene, i.e. the measurement technique, that uses a prototype with a camera from top, directed at a plane. The particle blueprint uses our prototype for a sphere. We want to invoke 40 particles in total.
# Physical boundary conditions
process_conditions:
feature_variabilities:
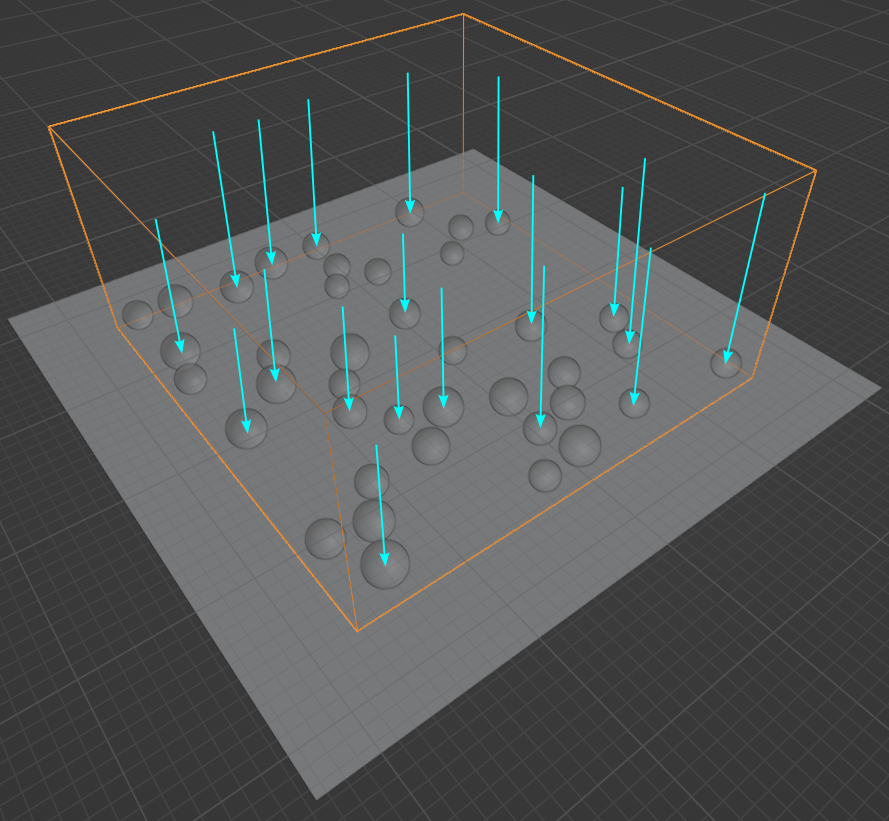
InitialParticleLocation:
feature_name: location
variability:
_target_: $builtins.UniformlyRandomLocationInMeasurementVolume
# Procedural steps of synthetization chain
synth_chain:
feature_generation_steps:
- _target_: $builtins.InvokeBlueprints
affected_set_name: AllMeasurementTechniqueBlueprints
- _target_: $builtins.InvokeBlueprints
affected_set_name: AllParticleBlueprints
- _target_: $builtins.TriggerFeatureUpdate
feature_variability_name: InitialParticleLocation
affected_set_name: AllParticles
We define just one process condition to distribute the particles inside the measurement volume. Our synth chain consists of three feature generation steps, which will first invoke the two defined prototypes and then trigger the update of the feature InitialParticleLocation to distribute all particles according to the definition in the feature_variabilities.
As a last step, we add a rendering step to our synth chain to output an image of the current scene. Our whole recipe file colPearls_plane.yaml looks now as follows.
# Initializing and seeding
defaults:
  - BaseRecipe
  - _self_
initial_runtime_state:
  seed: 42
# Defining blueprints
blueprints:
  measurement_techniques:
    TopCamInAir:
      measurement_technique_prototype_name: plane_topCam_fog
  particles:
    Bead:
      geometry_prototype_name: sphere
      number: 40
# Physical boundary conditions
process_conditions:
  feature_variabilities:
    InitialParticleLocation:
      feature_name: location
      variability:
        _target_: $builtins.UniformlyRandomLocationInMeasurementVolume
# Procedural steps of synthetization chain
synth_chain:
  feature_generation_steps:
    - _target_: $builtins.InvokeBlueprints
      affected_set_name: AllMeasurementTechniqueBlueprints
    - _target_: $builtins.InvokeBlueprints
      affected_set_name: AllParticleBlueprints
    - _target_: $builtins.TriggerFeatureUpdate
      feature_variability_name: InitialParticleLocation
      affected_set_name: AllParticles
  rendering_steps:
    - _target_: $builtins.RenderParticlesTogether
      rendering_mode: real
      do_save_features: True
We execute the recipe by our known python call.
python run.py --config-dir=recipes --config-name=colPearls_plane
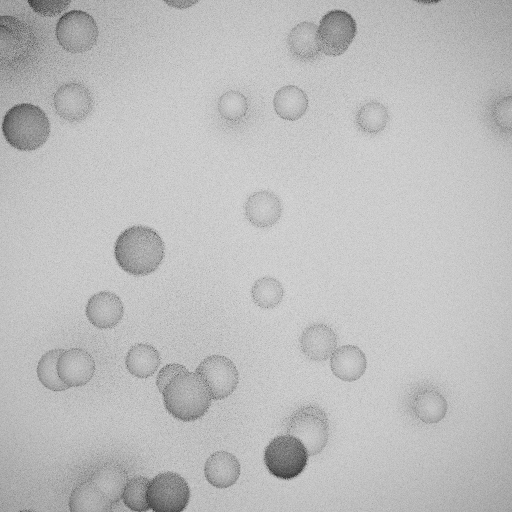
The resulting image can be found in the image file output/colPearls_plane/<YYYY-MM-DD_hh-mm-ss>/run0/real/<hash>.png under our root directory of synthPIC2 and provides a gorgeous view at the scene.
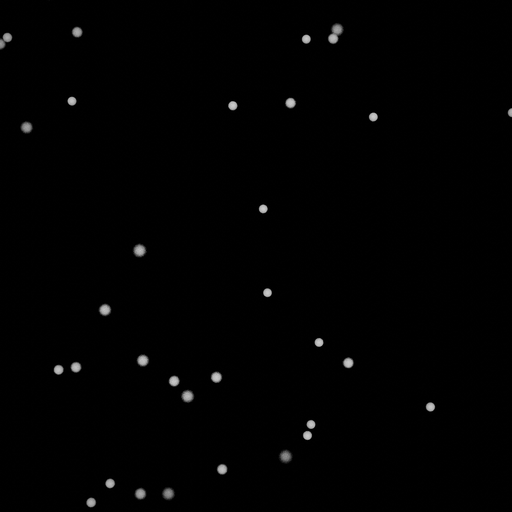
Ultimately, we want to add two more entries to the process_conditions and two more entries to the feature_generation_steps. Thus, we achieve a fast rendering by reducing the resolution of the final image and by specifying just a small number of 64 render samples, i.e. the number of paths to trace for each pixel.
# Initializing and seeding
defaults:
  - BaseRecipe
  - _self_
initial_runtime_state:
  seed: 42
# Defining blueprints
blueprints:
  measurement_techniques:
    TopCamInAir:
      measurement_technique_prototype_name: plane_topCam_fog
  particles:
    Bead:
      geometry_prototype_name: sphere
      number: 40
# Physical boundary conditions
process_conditions:
  feature_variabilities:
    InitialParticleLocation:
      feature_name: location
      variability:
        _target_: $builtins.UniformlyRandomLocationInMeasurementVolume
    RenderingResolutionPercentage:
      feature_name: resolution_percentage
      variability:
        _target_: $builtins.Constant
        value: 25
    CyclesSamples:
      feature_name: cycles_samples
      variability:
        _target_: $builtins.Constant
        value: 64
# Procedural steps of synthetization chain
synth_chain:
  feature_generation_steps:
    - _target_: $builtins.InvokeBlueprints
      affected_set_name: AllMeasurementTechniqueBlueprints
    - _target_: $builtins.InvokeBlueprints
      affected_set_name: AllParticleBlueprints
    - _target_: $builtins.TriggerFeatureUpdate
      feature_variability_name: InitialParticleLocation
      affected_set_name: AllParticles
    - _target_: $builtins.TriggerFeatureUpdate
      feature_variability_name: RenderingResolutionPercentage
      affected_set_name: AllMeasurementTechniques
    - _target_: $builtins.TriggerFeatureUpdate
      feature_variability_name: CyclesSamples
      affected_set_name: AllMeasurementTechniques
  rendering_steps:
    - _target_: $builtins.RenderParticlesTogether
      rendering_mode: real
      do_save_features: True
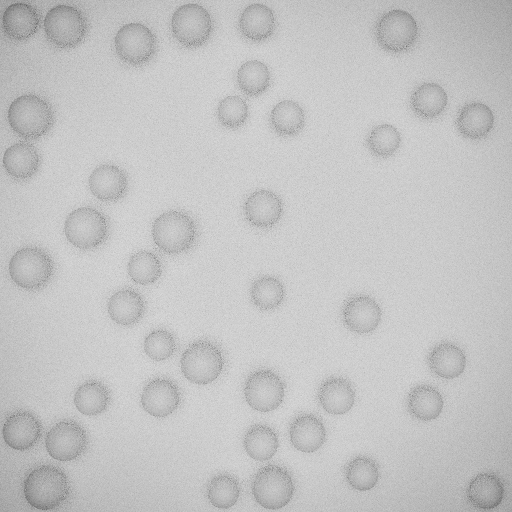
Step 2: Add Background and Enlarge Particles
Those particles are quite small at the moment and seem to be lost in space. Therefore, let’s first specify the simple plain material for the background.
blueprints:
  measurement_techniques:
    TopCamInAir:
      measurement_technique_prototype_name: plane_topCam_fog
      background_material_prototype_name: plain
In order to specify the particle size, we add the feature ParticleDimension to the feature_variabilities to specify that we want to vary this specific feature. As also already made use of in the first tutorial Synthesized Beads, we pick the function UniformDistribution3dHomogeneous again, which is one of the built-in functions of synthPIC2. Let’s add the block directly below the definition of InitialParticleLocation and before the definition of RenderingResolutionPercentage
process_conditions:
  feature_variabilities:
    InitialParticleLocation: …
    ParticleDimension:
      feature_name: dimensions
      variability:
        _target_: $builtins.UniformDistribution3dHomogeneous
        location: 3.3
        scale: 1.4
    RenderingResolutionPercentage: …
As opposed to our last use in the Synthesized Beads tutorial, this time we bring in a little bit more variation by defining a scale that is not equal to zero. The calculation of the function UniformDistribution3dHomogeneous can be found in the module variabilities.py, which is placed under ../synthpic2/recipe/process_conditions/variabilities.py under our root directory of synthPIC2. As we can see, the path follows the same logical structure as our recipe, which makes it easy to find the available functions for each section in our SynthRecipe. The formula in UniformDistribution3dHomogeneous reads as follows.
This simple linear equation, written as a function \(y=f(x)\) with the two constants \(C_\text{sc}\) for scale and \(C_\text{loc}\) for location, calculates the output value \(y\) based on a random number \(x\in [0,1)\). In other words, our dimension will result in a value somewhere in the range \(3.3\dots 4.7\) assuming the parameters defined above. The whole function UniformDistribution3dHomogeneous returns a three-dimensional tuple with that calculated value \(y\) in each dimension. We will use those for our three dimensions in space. We do so by specifying that the prototype feature with name dimensions shall be affected by that function when we defined the feature variability, which we called ParticleDimension.
We need to add one more entry in the synth_chain under feature_generation_steps for the definition of the particle dimension to take effect.
synth_chain:
  feature_generation_steps:
    - _target_: $builtins.InvokeBlueprints …
    - _target_: $builtins.InvokeBlueprints …
    - _target_: $builtins.TriggerFeatureUpdate
      feature_variability_name: InitialParticleLocation
      affected_set_name: AllParticles
    - _target_: $builtins.TriggerFeatureUpdate
      feature_variability_name: ParticleDimension
      affected_set_name: AllParticles
    - _target_: $builtins.TriggerFeatureUpdate
      feature_variability_name: RenderingResolutionPercentage
      affected_set_name: AllMeasurementTechniques
To keep the recipe well organized, we added these three new lines just right in between the other both triggers, which update the features location and resolution_percentage, which were defined in the feature_variabilities named InitialParticleLocation and RenderingResolutionPercentage, respectively. Let’s execute our recipe and have a look at our current output image.
As a last measure, we complete our both blueprints by defining the materials and the parent of our particle blueprint Bead. We set the materials for measurement volume and for the particle blueprint and we define that the parent of the particle ensemble should be the MeasurementVolume.
blueprints:
  measurement_techniques:
    TopCamInAir:
      measurement_technique_prototype_name: plane_topCam_fog
      measurement_volume_material_prototype_name: vacuum
      background_material_prototype_name: plain
  particles:
    Bead:
      geometry_prototype_name: sphere
      material_prototype_name: plain
      parent: MeasurementVolume
      number: 40
Step 3: Relax and Fall
This section is about an advanced use of our RelaxCollisions function. First, we will use it in the same way as we did in the Synthesized Beads tutorial. But this time, we add the additional parameter num_frames.
synth_chain:
  feature_generation_steps:
    - _target_: $builtins.InvokeBlueprints …
    - _target_: $builtins.InvokeBlueprints …
    - _target_: $builtins.TriggerFeatureUpdate …
    - _target_: $builtins.TriggerFeatureUpdate
      feature_variability_name: ParticleDimension
      affected_set_name: AllParticles
    - _target_: $builtins.RelaxCollisions
      affected_set_name: AllParticles
      num_frames: 20
      collision_shape: SPHERE
    - _target_: $builtins.TriggerFeatureUpdate
      feature_variability_name: RenderingResolutionPercentage
      affected_set_name: AllMeasurementTechniques
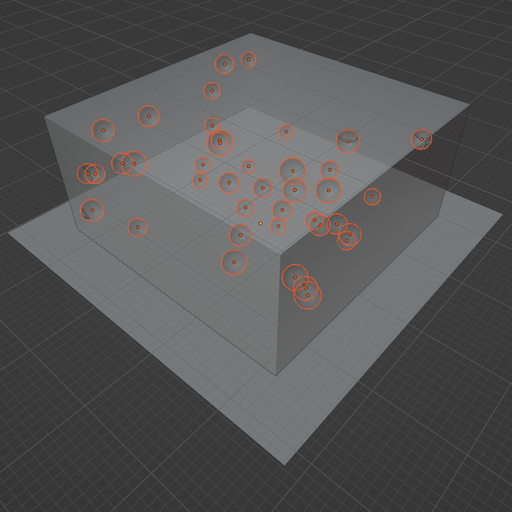
When we render the scene and compare with our previously rendered image, we notice a slight change: Some particles have moved.
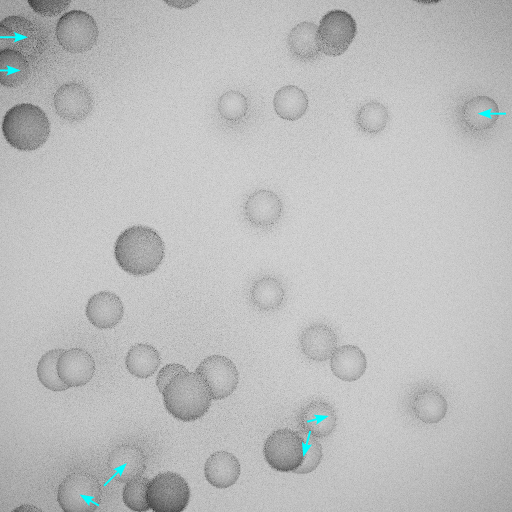
To be more exact, those particles moved, which were intersecting each other and which were touching the boundary of our small little world, i.e. the measurement volume. We can do even more with the RelaxCollisions function. Let’s add another additional feature_generation_step after our recent call of the function RelaxCollisions and let’s call it another time with some more parameters.
synth_chain:
  feature_generation_steps:
    - _target_: $builtins.InvokeBlueprints …
    - _target_: $builtins.InvokeBlueprints …
    - _target_: $builtins.TriggerFeatureUpdate …
    - _target_: $builtins.TriggerFeatureUpdate …
    - _target_: $builtins.RelaxCollisions
      affected_set_name: AllParticles
      num_frames: 20
      collision_shape: SPHERE
    - _target_: $builtins.RelaxCollisions
      affected_set_name: AllParticles
      use_gravity: True
      damping: 0.07
      friction: 0.4
      restitution: 0.1
      collision_margin: 0.5
      num_frames: 150
      collision_shape: CONVEX_HULL
    - _target_: $builtins.TriggerFeatureUpdate …
We just specified to let this physics simulation run with gravity enabled by setting the parameter use_gravity to True. The following three parameters damping, friction and restitution define the particles’ movement in space and their behavior when they collide with each other or other objects in the scene. With the parameter num_frames: 150 we set a higher number than before to let the simulation run a little longer until all particles come to rest on the ground.
An important parameter for the collision is the shape, which is used during calculation. Since, we intentionally want the particles to not overlap each other on the final image – even more: we do want to leave a gap between them – we define a quite high collision_margin of 0.5 and define the collision_shape as CONVEX_HULL. After execution of the recipe, the rendered image shows our neatly behaving particles, which rest on the plane and respect each other’s space – as a result of our RelaxCollisions functions.
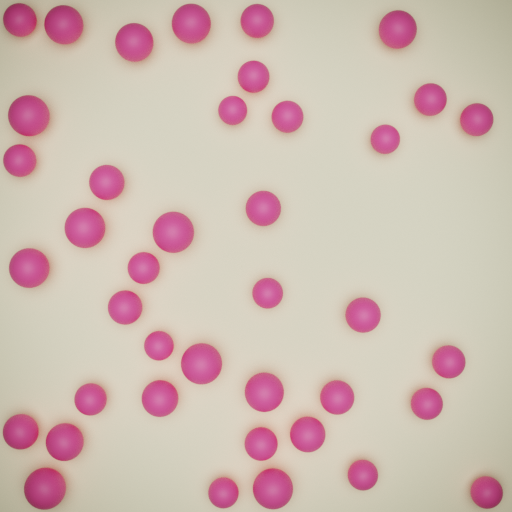
Step 4: You Promised Color!
Still dreary gray particles… one thing is missing, right? In this last section of this tutorial, we are using a plugin to set an attribute, namely the color.
As opposed to the functions we called before, a plugin lays outside of the main synthPIC2 toolbox and therefore provides a very handy mechanism to add functionality without touching the main sources of the toolbox. Thus, a plugin offers a way more modular approach to extend the toolbox and favors quick sharing. Feel free to use this mechanism for testing / trial’n’error of functions as easily portable, separate package.
The synthPIC2 deploy version comes with one plugin, called official. It contains a few functions for process_conditions and is mainly intended for educational purpose of demonstrating the plugin mechanism.
process_conditions:
  feature_variabilities:
    InitialParticleLocation: …
    ParticleDimension: …
    RenderingResolutionPercentage: …
    CyclesSamples: …
    BackgroundColor:
      feature_name: color
      variability:
        _target_: $plugins.official.ConstantHsvColorAsRgb
        hue: 0.15
        saturation: 0.35
    PinkColor:
      feature_name: color
      variability:
        _target_: $plugins.official.ConstantHsvColorAsRgb
        hue: 0.95
        saturation: 0.85
These newly added lines of code define two new feature_variabilities. The first one, called BackgroundColor, will set the color of the background when triggered. The second one, called PinkColor, will set the particles’ color. They both reference to the same feature with the name color, which is a feature of the material prototype, see prototype_library/materials/plain.yaml. The materials of both our blueprints, the one for the background of our measurement technique TopCamInAir and the material for our particle type Bead, origin from this same material prototype plain. We will later trigger these separately by specifying a different affected_set_name. However, this example clearly shows the way of manipulating features in synthPIC2, which is very generically designed for the main task of this toolbox: to easily bulk change any features of the virtual scene with intentional randomization.
We first have a closer look at the functions, which we called, and their location in the plugin. Again the namespaces, path names and respective modules follow the consistent structure of synthPIC2. Under the root path of synthPIC2 we locate the folder plugins with a subfolder called official. The latter is the name of the plugin. Further subfolders within a plugin folder mirror the structure below synthpic2/recipe/. The parser does the rest, so in the end we only need to set the respective target for a function call via $plugins.<plugin name>.<function name> without further specification of submodules.
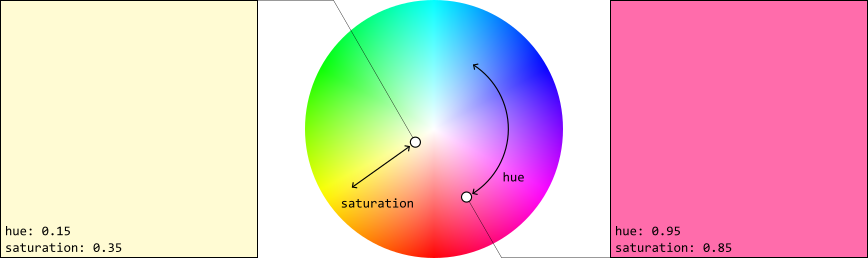
In our current example, we called the function ConstantHsvColorAsRgb which can be found in plugins/official/process_conditions/variabilities.py. This function converts a color given in the HSV representations to the RGB representation, which we need to specify the feature color. In a later example, we will have a closer look at defining various colors in HSV representation. For now, it is enough to know that a color can be defined by a hue and a saturation value, see the following figure for visualization in the color wheel.
Our recent code snippet added the two feature variabilities, which each tell the feature color to be restricted to a specific color when triggered. Now, we need to add the corresponding triggers to update the feature. Let’s add those right below our RelaxCollisions functions.
synth_chain:
  feature_generation_steps:
    - _target_: $builtins.InvokeBlueprints …
    - _target_: $builtins.InvokeBlueprints …
    - _target_: $builtins.TriggerFeatureUpdate …
    - _target_: $builtins.TriggerFeatureUpdate …
    - _target_: $builtins.RelaxCollisions …
    - _target_: $builtins.RelaxCollisions …
    - _target_: $builtins.TriggerFeatureUpdate
      feature_variability_name: BackgroundColor
      affected_set_name: AllMeasurementTechniques
    - _target_: $builtins.TriggerFeatureUpdate
      feature_variability_name: PinkColor
      affected_set_name: AllParticles
As mentioned earlier, both defined feature variabilities – BackgroundColor and PinkColor – reference the same feature color of the material prototype. They both define to restrict the color in different ways, i.e. they specify different colors. However, we want to give different objects in our scene only one of the both colors and we want to concretely specify which object should get which color.
To concretely specify which member of our scene shall be affected when a feature update is triggered, we specify these single objects or multiple objects, i.e. a group of objects, in sets. Since we only want to differentiate between our particles and the background, which is part of the measurement technique, we simply use the both predefined standard sets AllParticles and AllMeasurementTechniques.
process_conditions:
  feature_variabilities:
    InitialParticleLocation: …
    ParticleDimension: …
    RenderingResolutionPercentage: …
    CyclesSamples:
      feature_name: cycles_samples
      variability:
        _target_: $builtins.Constant
        value: 2048
As a last measure, we increased our render samples to get a nice and crisp image from our final rendering where every pixel’s color results from 2048 traced paths.